It's like going back in time
You’ve probably read several troubleshooting articles that warn you to create a System Restore Point before making potentially drastic changes to your Windows computer. If you have no idea what a System Restore Point means, think of it as a backup copy of your PC’s settings and other vital system files.
Say you installed a malicious program or deleted a registry file by accident, and your computer begins to malfunction, you can easily undo these (unwanted) changes by performing a System Restore. That allows you to revert your computer to an initial state (called Restore Point) when things were working smoothly.
Table of Contents

In this guide, we’ll explain how System Restore works in Windows 10 and teach you several ways to manually create a system restore point.
Enable System Protection on Windows
System Protection is a section of the Windows OS where restore points are created and managed. To create restore points, you need to first have System Protection enabled on your device. Although some computers have this feature activated by default out-of-the-box, others may require you to manually turn it on.
To check if you have System Protection enabled on your PC, type “restore point” in the Windows search bar and click Create a restore point in the results.

That’ll redirect you to the System Protection window where you can configure System Restore on your device. An alternative route to this point is through Control Panel > System > System protection.
If the System Restore and Create buttons are grayed out, and the Protection status next to the System disk reads Off, that means System Protection is disabled on your computer.

To enable System Protection, select the System drive and click Configure.

Select Turn on system protection and click OK.

Windows automatically assigns about 3 – 10 percent of your hard drive for System Protection. You can change this by adjusting the Max Usage slider. However, make sure you assign at least 1GB (or more) because the System Protection feature won’t run if the reserved disk space is below 1GB.
If the reserved space gets occupied, Windows will delete older restore points to make room for new ones. We recommend that you proceed with the default disk space that Windows recommends.
The default allocation should be enough to accommodate as many restore points as possible. The more restore points you have, the higher the chances of recovering files, settings, and other configurations should your computer ever run into a problem.
With System Protection set up, you can now manually create restore points.
Manually Create a System Restore Point

Windows automatically creates restore points when you enable System Protection. It does so once every week or prior to significant events like a Windows update, driver installation, etc. You can also manually create a restore point if you’re making system-altering changes to your computer. For example, it’s always recommended to manually create a restore point before making changes to the Windows Registry.
To manually create a restore point, head to the System Protection window (Control Panel > System > System protection) and click Create.
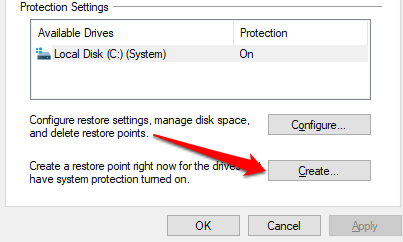
Type a description in the dialog box and click Create to proceed.

Windows will create the restore point and display a success message when done.

The creation process may take a couple of minutes, depending on the sizes of files in the restore point as well as your drive’s performance.
Create a Restore Point Using Windows PowerShell
There are usually many ways to get things done on Windows. You can swiftly create a restore point in seconds using the Windows PowerShell. All you need to do is paste some commands in the PowerShell console; we’ll show you how.
Type “PowerShell” in the Windows search bar and click Run as Administrator on the results.

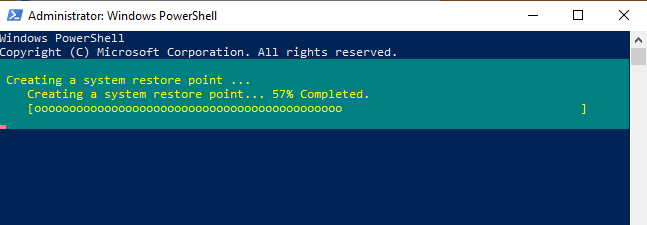
Paste the command below in the PowerShell console and press Enter.
powershell.exe -ExecutionPolicy Bypass -NoExit -Command “Checkpoint-Computer -Description ‘Restore Point Name’ -RestorePointType ‘MODIFY_SETTINGS’”
Note: You can replace the “Restore Point Name” placeholder in the command with any description of your choice.

Windows will create the restore point when the progress bar hits 100%.
By default, you can only create one restore point with PowerShell once in 24 hours. If Windows displays an error that reads “A new system restore point cannot be created because one has already been created within the past 1440 minutes,” that means Windows has automatically created a restore point for you in the past 24 hours.

How to Recover Changes Using System Restore
Now that you’ve created a restore point, how do you use it to revert to an earlier point if your PC runs into issues? Perhaps, you recently installed a Windows update or network driver that messed up your internet connectivity. Here’s how to undo system changes using System Restore.
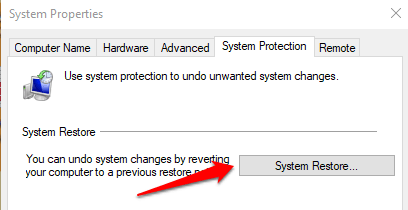
Launch the System Protection window (Control Panel > System > System protection) and click System Restore.
Click Next to launch the System Restore window. On this page, you’ll find a list of all restore points, their description, as well as the date & time they were created. Windows also labels restore points by “Types”—Manual restore points are those you created yourself while System describes a restore point automatically generated by Windows.

Select the restore point and click Next to proceed. Make sure you select the restore point just before the event that triggered the issue you’re trying to fix.
Pro Tip: Click the Scan for affected programs button to see a list of apps that Windows will delete during the system restore process.
If you cannot remember the restore point’s description, or there are multiple items on the list with similar descriptions, check the date/time and select the most recent entry.
Click Finish on the next page to confirm your selection. Windows will restart your computer, so make sure you close all active apps to avoid losing unsaved files & data.

Can’t find a restore point in the System Restore window? Refer to this troubleshooting guide on fixing missing restore points on Windows.
Windows Won’t Boot? Here’s How to Perform a System Restore
The technique above shows you how to undo changes with System Restore when your computer is on. But what if your computer won’t start up at all? Or perhaps Windows boots correctly but crashes before you get to the System Restore window? How then do you restore your device?
Like we mentioned earlier, Windows often provides multiple ways to get things done. So, if your PC won’t properly load Windows, you can initiate a system restore from the Advanced Startup Options menu.
Power off your PC and turn it back on. Press and hold the power button as soon as the Windows logo appears on the screen to shut down your PC again. Repeat this three times and your PC should boot into the Windows Recovery Environment.
Windows will diagnose your computer and display either of these error messages: “Automatic Repair couldn’t repair your PC” or “Your PC did not start correctly.” Ignore the error message and click Advanced options to enter the Advanced options menu.

Next, click Troubleshoot > Advanced Options > System Restore and select your username on the next page.

Enter your account password to continue. If your account isn’t password-protected, leave the password box empty and click Continue. Select a restore point from the list and click Next to proceed.

Never Lose Important Files & Settings
You’ve learned how to manually create a system restore point and how to perform a system restore, even when your computer won’t boot. However, you should note that a system restore isn’t a backup solution; it only saves system files and settings, not your personal data.
In addition to manually creating a restore point, we also recommend creating a System Image Backup or a recovery CD/USB drive. With these, you can restore your computer (including all installed programs, settings, files, etc.) to a previous state should your PC get corrupted to the point where it won’t load Windows.